

The term “Kubernetes” is a Greek word that means “helmsman” or “pilot.” Kubernetes was founded by Joe Beda, Brendan Burns, and Craig McLuckie who were later joined by other Google engineers Brian Grant and Tim Hockin. It was first announced by Google in mid-2014. Originally, it was given the codename Project 7 within google which is now depicted as seven spokes on the wheel of the Kubernetes logo. The term was abbreviated as K8 by replacing the eight letters of “ubernete” with the digit 8.
Now, let’s dive deeper and know what exactly Kubernetes is and how it works.
Defining The Term “Kubernetes”
Before we begin defining and explaining what Kubernetes is, you need to first understand two concepts namely immutable infrastructure and containers.
- Immutable infrastructure is a practice where servers once deployed are never modified again. If some change has to be made, it is never done directly on the servers. Rather, a new server is built from a base image that has all the desired changes baked in. In this way, the old server is replaced with the new one without modifying the previous one.
- Containers let us package code, runtime, system tools, system libraries, and configurations together. This shipment is a lightweight, standalone executable. This will make your application work the same way every time no matter where it runs (e.g, Ubuntu, Windows, etc.). It is not a foreign concept, but it has recently captured popularity with the increase in microservices and Docker.
Now that you are well versed in these terms, we can move forward and define Kubernetes. It is defined as a container or microservice platform that organizes computing, networking, and storage infrastructure workloads. Kubernetes lets us enjoy all the advantages of an immutable infrastructure because it doesn’t restrict the types of apps you can install in it. K8s follows a simple rule: if your app fits in a container, Kubernetes will install it.
Tracing the history of Kubernetes back to 2014, it was an open-sourced project by Google after using it to run production workloads at scale for more than a decade. K8 provides the power to run dynamically scaling, containerized applications, and utilizing an API for management. It is a vendor-agnostic container management tool that minifies cloud computing costs while simplifying the running of flexible and scalable applications.
K8 has become the standard for running containerized applications in the cloud, with the main Cloud Providers (AWS, Azure, GCE, IBM, and Oracle) now offering managed Kubernetes services.
Basic Terms Related To Kubernetes
Before you dig deeper to understand how to use K8s, you must know about the objects that are used in API. Basic K8s objects and various higher-level abstractions are termed as controllers. These are the key components of your application lifecycle.
Basic objects comprise of:
- Pods: They are a cluster of one or more containers.
- Service: It is a coupling of a set of pods to a policy by which you access them. They are used to expose containerized applications to origins from outside the cluster.
- Volume: It is defined as an abstraction that lets us persist data. It is necessary because containers are ephemeral which means that data is deleted when the container is deleted.
- Namespace: It is a segment of the cluster dedicated to a specific purpose, for example, a certain project or team of devs.
Controllers or high-level abstractions contain the following:
- ReplicaSet (RS): Its main purpose is to maintain a set of replica Pods running at any given time. If one pod dies or crashes, the replica set configuration will assure that a new one is created in its place.
- Deployment: Offers declarative updates for pods and RS.
- StatefulSet: It is a workload API object that manages stateful applications, such as databases.
- DaemonSet: It ensures that all or some worker nodes run a copy of a pod. This is useful for daemon applications like Fluentd.
- Job: It creates one or more pods, runs a certain task(s) to completion, then deletes the pod(s).
Other Terminology
- Micro Service: It is defined as a part of a previously monolithic application. A conventional micro-service based architecture would have multiple services making up one, or more, end products. It is typically shared between applications and makes the task of Continuous Integration and Continuous Delivery easier to manage.
- Images: It is generally a docker container image- an executable image that contains everything you need to run an application; application code, libraries, a runtime, environment variables, and configuration files.
- Deployments: It is a way to explain the state of pods or replica set. Deployments is a term used to refer to HA policies to your containers by defining policies around how many of each container must be running at any point in time.
- Nodes: Normally it is a virtual host(s) on which containers/pods are run.
What Is The Architecture And Components of Kubernetes?
A K8s cluster generally comprises a master node that exposes the API, schedules deployments, and manages the cluster. Multiple worker nodes are often liable for container runtime, like Docker or rkt, alongside an agent that communicates with the master.
Master Components
The following master components comprise a master node:
- Kube-apiserver: It is used to expose the API
- Etcd: It is a key-value that stores all cluster data (It can be run on the same server as a master node or on a dedicated cluster.)
- Kube-scheduler: It lets you schedule new pods on worker nodes.
- Kube-controller-manager: It helps you run the controllers.
- Cloud-controller-manager: It talks to cloud providers.
Node Components
It includes the following:
- Kubelet: It is an agent that assures that containers in a pod are running.
- Kube-proxy: It is used to keep the network rules and to perform forwarding.
- Container runtime: It helps in running containers.
What Are The Advantages of Kubernetes?
K8s provides us various key characteristics that permit us to run immutable infrastructure. Containers can be killed, replaced, and self-heal on their own, and the new containers receive access to those support volumes, secrets, configurations, etc. that make it operative.
Following key features of Kubernetes make your containerized application scale efficiently:
- Horizontal scaling: One of the greatest advantages of K8s is that it scales your application as needed from a command line or UI.
- Automated rollouts and rollbacks: It automatically rolls out changes that monitor monitors the health of your application which ensures that all instances don’t fail or go down simultaneously. If anything goes wrong, K8s rolls back the change on its own.
- Service discovery and load balancing: Containers get their own IP, therefore, you can put a set of containers behind a single DNS name for load balancing.
- Storage orchestration: It automatically mounts local or public cloud or network storage.
- Secret and configuration management: K8s creates and updates secrets and configurations without rebuilding your image.
- Self-healing: The K8s platform heals several problems including restarting failed containers, replacing and rescheduling containers as nodes die, killing containers that don’t respond to your user-defined health check, and waiting to advertise container to clients until they are ready.
- Batch execution: K8s lets you manage your batch and continuous integration workloads and replace failed containers.
- Automatic binpacking: It automatically schedules containers based on resource requirements and other constraints.
What Kubernetes Isn’t Capable Of Doing?
Even though Kubernetes is very beneficial and capable of doing a lot of things but still there are several things that Kubernetes isn’t capable of which includes the following:
- It can not replace tools like Jenkins, therefore, it will not build your application for you.
- It is not a middleware, hence, it will not be able to carry out tasks that middleware does, such as message bus or caching.
- It has nothing to do with the logging solution. If your app gets stdout, you can collect the logs with whatever you want.
- It doesn’t pay attention to your configuration language (for instance, JSON)
K8s doesn’t give these options because it permits us to build our app the way we wish to, expose any type of information and collect that information in a manner we want to.
Starting Off With Kubernetes
Generally, Kubernetes is installed either on premise hardware or one of the major cloud providers. These days, many cloud providers and third parties are offering Managed Kubernetes services, nonetheless, it is not only costly but also not required for a testing/learning experience. Thus, Minikube is one of the simplest and quickest ways to start off with Kubernetes.
Installing Kubernetes
Installing K8s is a very simple process. All you need are only two things which include Kubectl and Minikube.
- Kubectl is a CLI tool that makes it possible to interact with the cluster.
- Minikube is a binary that deploys a cluster locally on a development machine.
Using these tools, you can begin deploying your containerized apps to a cluster locally within a few minutes. For a highly-available production-grade cluster, you can use tools that include:
- Kops
- EKS, which is an AWS managed service
- GKE, which is provided by Google
Before you move forward to install Kubernetes, you need to install Minikube on your machine. When you are done installing Minikube, you are now all set to run a virtualized single-node cluster with;
$ minikube start
Interaction with Kubernetes clusters is mostly done through the kubectl CLI or the Kubernetes Dashboard. The Kubectl CLI also supports bash autocompletion which saves a lot of typing (and memory).
In order to interact with your Kubernetes clusters, you will need to set your Kubectl CLI context. A Kubernetes context is a group of access parameters that determines which users have access to namespaces within a cluster. When starting minikube the context is automatically switched to minikube by default. There are a number of kubectl CLI commands used to define which Kubernetes cluster the commands execute against.
$ kubectl config get-context
$ kubectl config set-context <context-name>

$ Kubectl config delete-context <context-name>
Deploying Containerized Application To Minibuke
By now you should have a local single-node Kubernetes cluster running on your local machine. Next, we are going to outline the steps needed to deploy a simple “Hello World” containerized application, inside a pod, with an exposed endpoint on the Minibuke node IP address. Create the Kubernetes deployment with;
$ kubectl run hello-minikube –image=k8s.gcr.io/

echoserver:1.4–port=8080
After we find out that our deployment was successful, we can view the deployment with;

$ kubectl get deployments
The above deployment should have created a Kubernetes Pods. You can view the pods running in our cluster with;

$ kubectl get pods
Before you hit your Hello World application with an HTTP request from an origin from outside your cluster (i.e. development machine), you need to expose the pod as a Kubernetes service. By default, pods are only accessible on their internal IP address which has no access from outside the cluster.
$ kubectl expose deployment hello-minikube —

type=NodePort
When you expose a deployment, it creates a Kubernetes service. You can view the service with:

$ kubectl get services
If you are using a cloud provider, you would normally set- type=loadbalancer to allocate the service with either a private or public IP address outside of the ClusterIP range. Minikube doesn’t support load balancers, being a local development/testing environment and therefore —type=NodePort uses the minikube host IP for the service endpoint. To find out the URL used to access your containerized application type;

$ minikube service hello-minikube -—url
Curl the response from your terminal to test that our exposed service is reaching the pod.
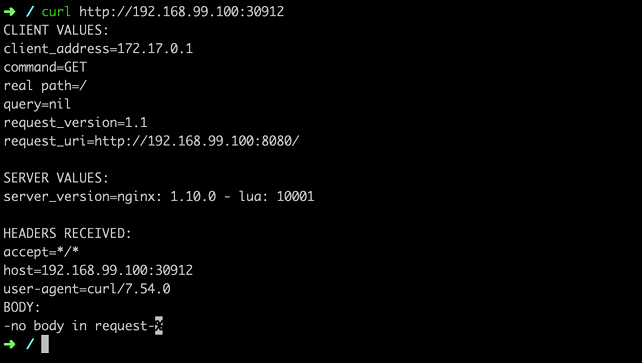
$ curl http://<minikube-ip>:<port>
Now that we have made an HTTP request to our pod through the Kubernetes service, we can confirm that everything is working as we expected it to. By checking the pod logs we can see our HTTP request.

$ kubectl logs hello-minikube-c8b6b4fdc-sz67z
Summarizing it all, you are now running a simple containerized application inside a single-node Kubernetes cluster, with an exposed endpoint via a Kubernetes service.
